By day 30 a new rep should run a full conversation without help and have some result to show, even one sale. By day 60 they produce steadily and can work a territory alone. By day 90 they sit at or near team average without you watching. At each mark you make a call: keep them, fix one thing, or cut.
The marks come from Part 5 of the Recruiting & Retention Playbook. Tell the rep about them on day one. A standard they knew about is motivating; one they discover at day 60 is an ambush. Put three reviews on the calendar in advance, twenty minutes each.
What they should be able to do at each mark
| Mark | They should be able to | The decision |
|---|---|---|
| Day 30 | Run a full conversation unassisted. Handle the two most common objections without freezing. Hit a consistent activity number. Produce some result, even one sale. | Low activity and no result: cut. High activity and no result: keep them and fix the conversation. That is a coachable rep, and the easiest one to lose by mistake. |
| Day 60 | Produce consistently, not in bursts. Run a territory on their own. Recover from a bad day without losing the next one. | Still inconsistent with good activity: one more month with a specific plan. Activity has slipped: that is disengagement, and it rarely turns around without a direct conversation now. |
| Day 90 | Perform at or near team average without daily supervision. Be someone you’d put a new rep next to. | At or above average: invest. Below average with good habits: one defined final period. Below average with bad habits: end it. |
Every call in that table turns on activity and results, read separately. The planner below gives each its own row, doors per day and sales, filled in every week.
The Playbook’s Part 5 goes further: what you owe the rep at each mark, how to read activity against results, and how to cut someone well.
The free planner: 90 days on one page
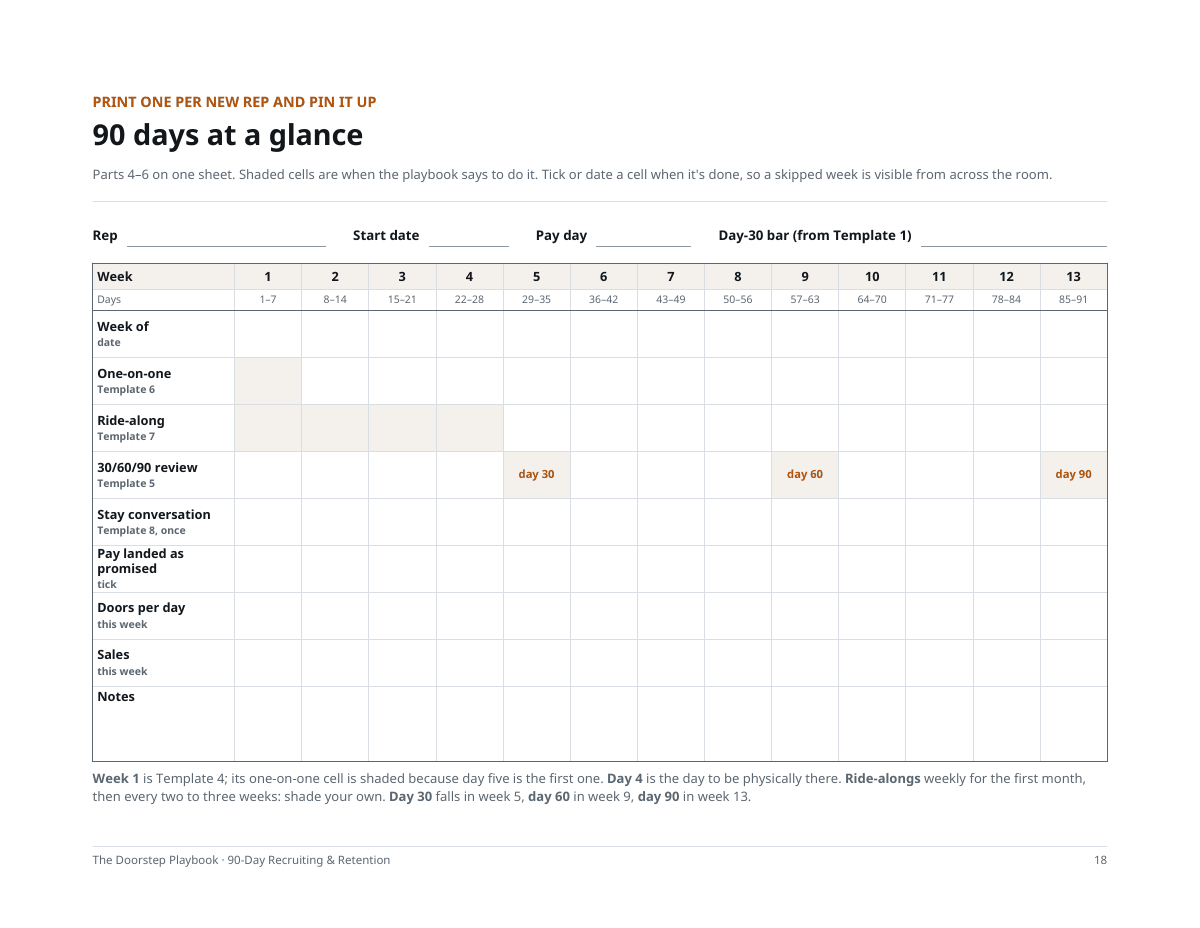
This is the Playbook’s “90 days at a glance” page, one landscape sheet per new rep, meant to be pinned up where you both see it. Weeks 1 to 13 run across the top, which covers days 1 to 91. Above the grid are blanks for the rep, start date, pay day and the day-30 bar. The rows:
- Week of, with the date
- One-on-one, every week (week 1 is shaded because day five is the first one)
- Ride-along, shaded for weeks 1 to 4
- 30/60/90 review, marked at week 5 (day 30), week 9 (day 60) and week 13 (day 90)
- Stay conversation, once
- Pay landed as promised, a tick
- Doors per day, for that week
- Sales, for that week
- Notes
Tick or date a cell when it’s done. A skipped week then shows from across the room.
Free, no email. One page, US Letter, landscape.
How to use it
- Week one: write in the rep’s name, start date and pay day, plus the day-30 bar you set when you defined the seat. Pin it up.
- Every week: hold the fifteen-minute one-on-one, tick it, and write in that week’s doors per day and sales.
- Weeks 1 to 4: ride along every week. After that, every two to three weeks, and shade those cells yourself.
- Weeks 5, 9 and 13: the 30/60/90 review. Read the doors per day and sales rows before you decide anything.
Reading it across the team
One planner follows one rep. Across every hire, the number to watch is 30/60/90 survival: how many of your hires reach each mark. The four numbers a D2D manager needs covers how to count it on a small team, and why it grades you rather than the reps.
If reps are gone before the day-30 review comes around, look at week one first. Why new reps quit in week two walks through day four and what goes wrong on it.
The review itself has a sheet. Template 5 in the Recruiting & Retention Playbook is one page per review: the rep’s numbers beside the team’s, which activity and results box they’re in, and a line for the decision. The Playbook is $37.